Setup
Welcome to the setup guide.
To get this plugin setup will only take around 30 mins. This guide will be broken down into steps. You must first do a test transaction using the test ePDQ account. The ePDQ team will supply you with two logins, one for test and the other for live. You can get to both the test and live logins from here.
It is always best practice when setting up a payment gateway to do this in test mode first and run several orders before switching to live mode.
Getting Ready
Before diving in, make sure you have:
- An active Barclaycard ePDQ merchant account. Don’t have one yet? Get in touch with Barclaycard to set it up.
- Access to the backend of your WooCommerce website.
Step 1 – Plugin settings.
Install the plugin & activate the license key; once this is done, you want to navigate the plugin settings page. This can be found in the WooCommerce settings:
The key items here for the setup are PSPID, SHA-IN, SHA-OUT & SHA encryption method.
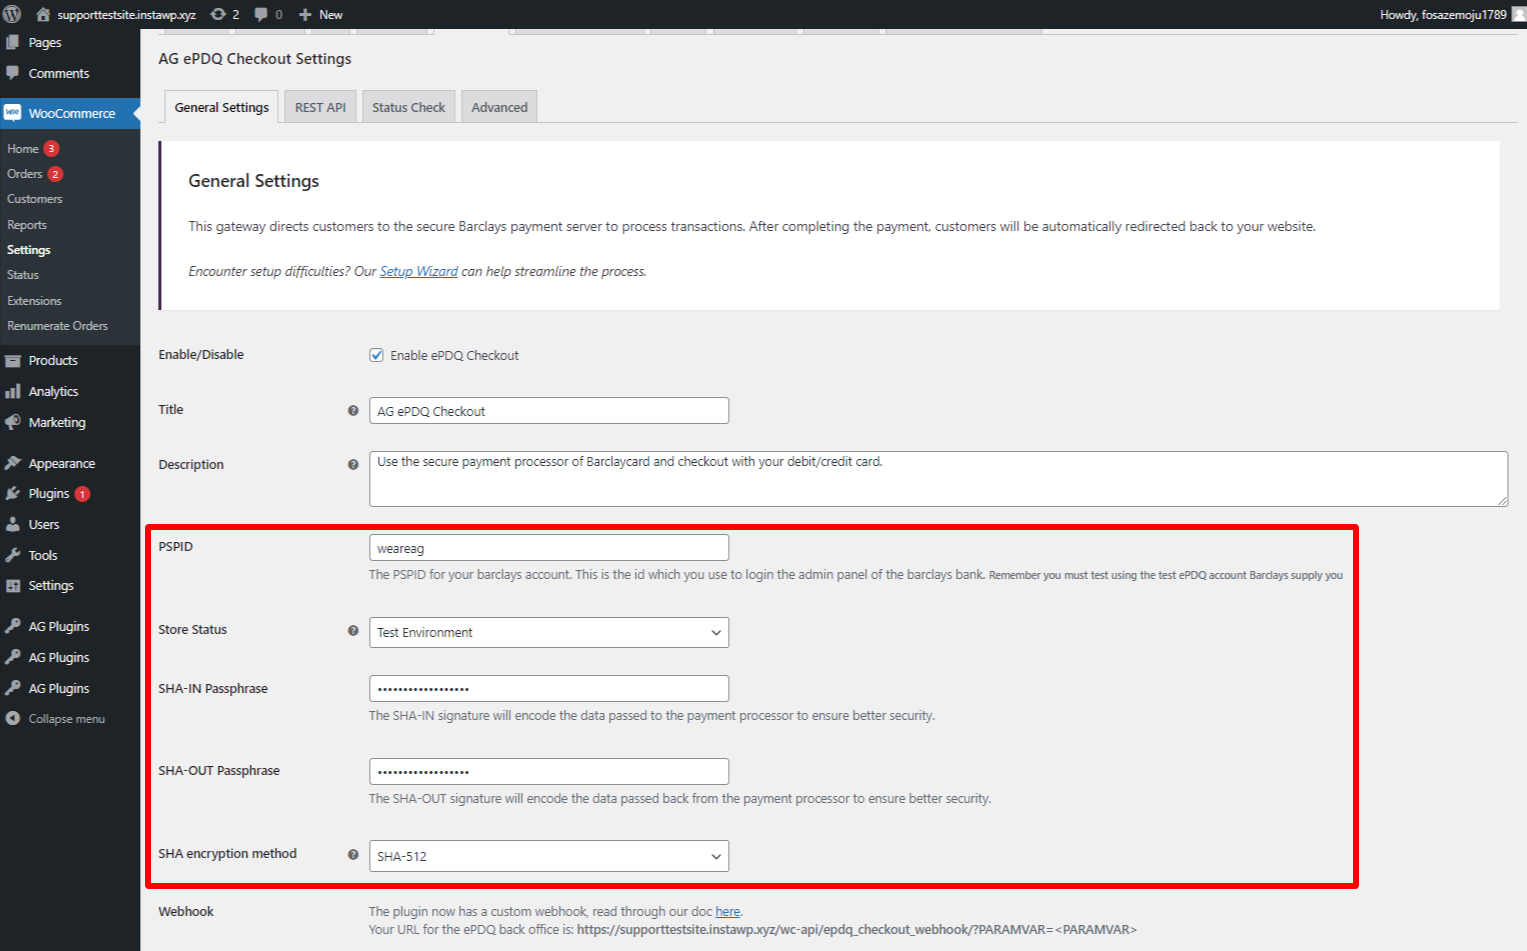
These settings will need to be matched with what you enter in the ePDQ back office.
Step 2 – Login to the test ePDQ back office.
The next set of items are done in the ePDQ back office; you can log in to the test account here. Once logged in, you need to navigate to the technical settings area. It is important to note that whatever changes to make in the test account, you must match in the live account.

From this area, we have access to all the sections we need to change/edit.
How to know if you are using the ePDQ test account? When you have logged in, look at the Barclaycard logo. To the right of it, you will see TEST in red like this:

If you don’t have access to the test account, you/your client will need to email the ePDQ team here: epdqsupport@barclaycard.co.uk and ask for logins again. It’s also important to note that if the ePDQ account is new, you won’t be able to switch to live mode until you have done several test orders and applied to go live (You will see the option on the main ePDQ Home screen).
Step 3 – Global transaction parameters.
In this section, you need to decide which operation mode you want to run the payment gateway.

Based on these two options, you can choose between two default operation codes:
- Authorization: a pre-authorization transaction that reserves funds on a customer’s credit card. Authorize Only does not charge the card until you perform a Completion (Ticket Only) transaction and/or confirm shipment of the order (using an option available in Reports). Note that authorization reserves funds for varying periods, depending on the issuing card company’s policy. We strongly suggest that you confirm shipment as soon as possible after authorization.You can read more about how to process transactions for this operation mode from our guide – How To Process Pre-authorization Payments for ePDQ
- Sale: this is the most common transaction type which immediately charges a customer’s card or bank account.
Step 4 – Global security parameters.
In this section, we pick and match the SHA encryption method we set in the plugin settings.

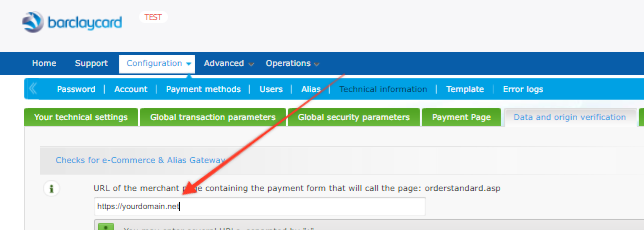
Step 5 – Data and origin verification.
We have two items to set/change in this section. The first item sets the payment page URL; this is the last URL on the website before the customer is sent to the ePDQ servers to make the payment; it normally looks like the following.
Change the domain to match your website address; without this set correctly, the payment gateway will not work; it is possible to have multiple domains/websites in this field. Add a ; between the URL’s as shown.
The next item here is the SHA-IN; this must match what you have in the plugin settings; we recommend that you use letters (combination of upper and lower cases), numbers, and certain special characters only (like “!”, or “?”) in this setting and that it has a minimum of 16 characters, please ensure that it should not go over more than 30 characters to avoid unexpected errors related to it. You should follow the NCSC guidance on choosing and storing passwords. from the National Cyber Security Centre (NCSC). You cannot use ^, {, }, [, ], “, ‘, |, <, or >.

Step 6 – Transaction feedback.
Again, in this section, we have only two items. The first one is to make sure that the tick box labeled “I would like to receive transaction feedback parameters on the redirection URLs.” is ticked.

Without this ticked, the ePDQ system won’t send data back to the website. This means you will get orders with pending payment and then fail. This is an important setting.
Next is to make sure to untick the box labeled “I would like Barclaycard to display a short text to the customer on the secure payment page if a redirection to my website is detected immediately after the payment process.”
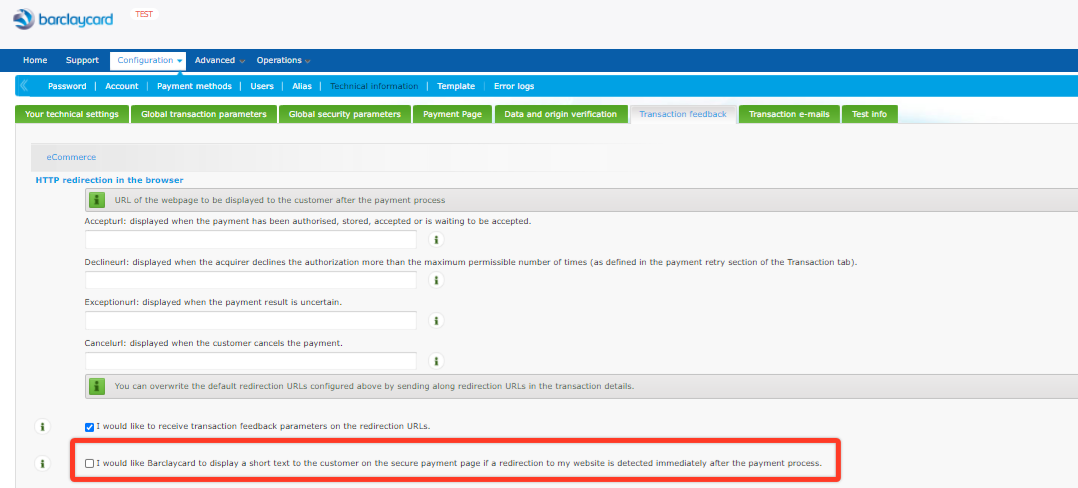
The next item here is the SHA-OUT; you will need to scroll down a little to see the option.

Again, this must match what you have set in the plugin settings; we recommend that you use letters (combination of upper and lower cases), numbers, and certain special characters only (like “!”, or “?”) in this setting and that it has a minimum of 16 characters, please ensure that it should not go over more than 30 characters to avoid unexpected errors related to it. You should follow the NCSC guidance on choosing and storing passwords. from the National Cyber Security Centre (NCSC). You cannot use ^, {, }, [, ], “, ‘, |, <, or >.
The final item here is parameters, which will be sent back to the website.

You only want the following in the selected section:
AAVADDRESS
ACCEPTANCE
COMPLUS
NCERROR
ORDERID
PAYID
STATUS
Step 7 – Enabling the “Processing ” Message during the payment process
In the same tab (Configuration> Technical Information >Transaction Feedback), scroll down a bit to the “General” section and tick the “I would like Barclaycard to display a “processing” message to the customer during payment processing.” option.

This option displays a processing message that should encourage users to wait until the redirection is completed. The “processing” message will temporarily disable access to the underlying payment pages, thus avoiding any blocking action by the customer on the payment pages (e.g. clicking the submit button again during processing).
Step 8 – 3D Secure.
This is very important if you sell products to EU customers. From 14 September 2019, all EU (Brexit does not affect this) credit card transactions could be rejected if your store does not have 3D secure setup.
With the enforcement of Strong Customer Authentication (SCA) & Payment Services Directive (PSD) is important to get the ePDQ back-office set up and ready. Thankfully this is quite simple.
And you will see something like the following:

The key here is to ensure that 3D secure is active on the card brands you wish to use on the website.
Step 9 – Test, Test & test.
Well done, you have now finished the setup of the plugin! Now the important thing to do is test the payment gateway a few times before going live.
If your plugin is in test mode, you may see this ACS Challenge simulator.

Don’t be alarmed as this is the expected behavior and you’ll only need to press the Continue Transaction button. Your customers won’t see this if you switch to live mode. To learn more about the ACS Challenge Simulator, kindly refer to this article.
If you have any errors/issues, you first want to check the ePDQ error log section.

In the description field, you will most likely find an error code, something like unknown order/1/r. If you do, you can have a look here at the troubleshooting error codes. There you will find out what the issue is and what is needed to fix it.
If you are still having issues, then enable the plugins debug log in the settings.

Run some test transactions, and if the plugin finds something wrong with the plugin setup, it will log this and tell you how to fix this. You can find the log by going here:

Here we can see the log saying that the transaction is confirmed, no issues were found.
If you still face issues, then send a support ticket, and we will have a look for you.
Please be ready to send screenshots of the plugin & ePDQ settings and the debug log.
Was this helpful?