How to Take and Share a Screenshot with AG Support
Sometimes the fastest way to resolve an issue is to show exactly what you see. Sharing a screenshot helps our Support team understand the problem quickly and take the next steps to resolve it.
If you’re having trouble taking a full-page screenshot with your current tool, Awesome Screenshot can help.
Awesome Screenshot is a browser extension that lets you:
- Capture full pages easily
- Highlight important areas, add text or arrows, and blur private details
- Record your screen
It’s our go-to tool for sharing screenshots or screen grabs for Support, making it simple to show what’s happening. You can get it from here.
How to use Awesome Screenshot
- Add the Awesome Screenshot extension in your browser.
- Navigate to the area you want to capture.
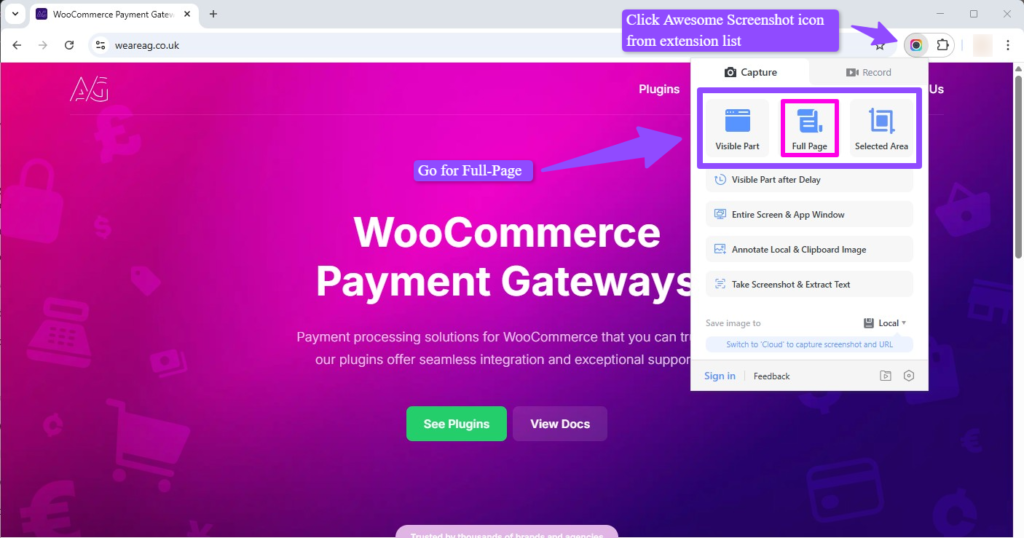
- Click the Awesome Screenshot icon in your browser toolbar.
- Pick Full Page, Visible Part, or Selected Area. Full Page is best to see everything.
- After taking a screenshot, a new tab will open showing your screenshot. You can add text or arrows, edit the image if needed, and click Done.

- Download and send the screenshot to AG Support so we can help you more quickly.

That’s it, quick and easy. Below are sample screenshots we might ask for your reference:
Order details (for payment or transaction issues)
When you contact Support about a payment or transaction issue, we may ask for a screenshot of the order details. This helps us understand the problem more quickly. How to find and screenshot an order:
- Log in to your WordPress Admin Dashboard.
- From the menu on the left, click WooCommerce → Orders.
- Find the order you need: Scroll through the list, or use the search box to enter the order number, customer name, or email address.
- Click the order number or customer name to open the order details page.
- Click the Awesome Screenshot icon in your browser toolbar.
- Select Full Page, a new tab will open showing your screenshot: Edit if needed, then Click Done.
- Save the image and share it with the AG Support Team.
Plugin Settings (for configuration or troubleshooting issues)
If Support asks for a screenshot of our plugin settings, here’s how to get it:
- Log in to your WordPress Admin Dashboard.
- From the left-hand menu, go to WooCommerce → Settings → Payments.
- Find AG Plugin in the list and click Manage.
- Take a screenshot of the settings page using Awesome Screenshot (Full Page works best).
- Click Done, Download it and Share the screenshot with the AG Support Team.
Shipping Settings (for troubleshooting issues)
If Support asks for a screenshot of your shipping settings, here’s how to get it:
- Log in to your WordPress Admin Dashboard.
- From the left-hand menu, go to WooCommerce → Settings → Shipping.
- You’ll see your Shipping Zones, Shipping Settings, and Classes. Click Shipping Settings.
- Take a screenshot of the page using Awesome Screenshot (Full Page works best).
- Save the image and share it with the AG Support Team.
Tax Settings (for troubleshooting)
If Support asks for a screenshot of your tax settings, here’s how to find them — and how to turn taxes on if they aren’t enabled yet.
Step 1: Enable Taxes (if not already)
- Log in to your WordPress Admin Dashboard.
- Go to WooCommerce → Settings → General.
- Scroll down to Taxes and Coupons.
- Tick the box that says Enable tax rates and calculations.
- Click Save changes at the bottom.
✅ Once taxes are enabled, the Tax tab will appear in your WooCommerce settings.
Step 2: Access Tax Settings
- From the left-hand menu, go to WooCommerce → Settings → Tax.
(If you don’t see “Tax,” double-check that taxes are enabled.) - Take a screenshot of the tax settings page using Awesome Screenshot (Full Page works best).
- Save the image and share it with the AG Support Team.
Including screenshots when reporting issues ensures clarity, minimizes back-and-forth, and helps teams resolve problems more efficiently. Should you have any questions or need further clarification about this, the AG Support team is always available to assist you.
Was this helpful?